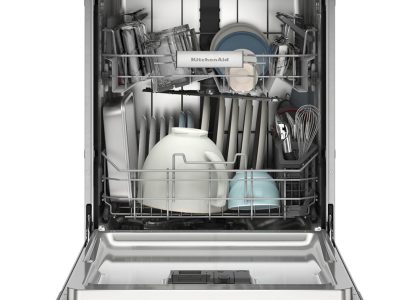
Pre-Cleaning Preparation
How to clean kitchenaid dishwasher? Before diving into how to clean your KitchenAid dishwasher, it’s crucial to perform some pre-cleaning tasks. These preliminary steps will make the cleaning process more effective and help you identify any areas that need special attention.
Gather Your Cleaning Supplies
First, assemble all necessary cleaning supplies. You will need:
- Soft cloths or sponges
- A soft-bristled brush
- Distilled white vinegar
- Baking soda
- Mild dish soap
Empty the Dishwasher
Ensure the dishwasher is empty. Remove dishes, utensils, and any dishwasher-safe accessories. This gives you full access to all parts of the dishwasher.
Inspect and Remove Debris
Look inside for any visible food particles or debris. Wipe away any residue from the bottom of the dishwasher. Pay special attention to the area around the drain. Removing debris prevents clogs and ensures better cleaning efficiency.
Check the Arms and Filter
Quickly inspect the spray arms and filter. Make sure there’s no obstruction that could affect water flow. If you notice large food particles or buildup, remove them. This step is essential for maintaining a powerful spray during the wash cycle.
By following these pre-cleaning preparations, you’ll set the stage for a thorough and successful cleaning of your KitchenAid dishwasher.
Cleaning the Dishwasher Filter
The dishwasher filter is crucial for maintaining clean wash water and effective dishwashing. It’s essential to clean this filter regularly to prevent food particles and debris from clogging the system. How to clean kitchenaid dishwasher? Here’s a simple guide on how to clean the KitchenAid dishwasher filter:
- Turn off the dishwasher: Always ensure your safety by turning off the dishwasher before starting any maintenance.
- Locate the filter: In most KitchenAid models, the filter is at the bottom of the dishwasher. It usually consists of an upper filter assembly and a lower filter or fine particle filter.
- Remove the filter: Twist the upper part counter-clockwise (sometimes a pull upwards is necessary). Carefully lift the filter assembly out.
- Clean with warm water: Rinse the filter under warm running water. Use a soft brush to gently remove any trapped food particles or other debris. Avoid using harsh cleaners that can damage the filter.
- Reinstall the filter: Once clean, put the filter back in place. Make sure it fits securely and correctly to avoid any issues during the dishwasher’s operation.
Regular cleaning of the dishwasher filter is key for optimal performance. Make this a part of your KitchenAid dishwasher maintenance routine to ensure effectively cleaned dishes every cycle.
Wiping Down the Dishwasher Interior
After addressing the dishwasher filter, it’s good practice to clean the interior. A sparkling interior can impact the machine’s performance. Here is how to clean the interior of your KitchenAid dishwasher effectively:
- Begin with the Door: Start by wiping the inner door panel. Use a damp cloth with mild dish soap to clean any stains or smudges.
- Clean the Walls and Base: Next, tackle the side walls and dishwasher base. Use a soft cloth to avoid scratching the surfaces. Remember to reach the corners where grime often accumulates.
- Address the Gasket: The door gasket can harbor mold and mildew. Run a cloth along the gasket’s length. A gentle scrub helps remove any buildup, ensuring a proper seal.
- Wipe the Racks: Remove the racks if they are detachable. Clean them with a sponge and soapy water. Rinse thoroughly before placing them back inside.
- Final Rinse: Once the interior is wiped, do a quick rinse with clean water. Use a fresh cloth to wipe the surfaces and remove suds.
Keeping the dishwasher’s interior clean is vital for optimal operation. Regularly wiping down these areas prevents the buildup of grime and ensures a hygienic environment for your dishes.
Unclogging the Spray Arms
After cleaning the filter and interior, it’s important to address the spray arms. These arms play a crucial role in your KitchenAid dishwasher’s ability to clean effectively. Clogged spray arms can lead to poorly cleaned dishes. Follow these steps to ensure they are unclogged and functioning well:
- Turn off the dishwasher: Safety first. Make sure the dishwasher is off. This prevents any accidental start during cleaning.
- Remove the spray arms: Depending on your model, you may need to unscrew or snap off the arms. Consult your manual if you’re unsure.
- Rinse with warm water: Hold the arms under running water to wash away loose debris. This step can dislodge smaller particles easily.
- Clean out the holes: Use a toothpick or a small soft-bristled brush to gently remove any blockages from the spray arm holes.
- Soak if needed: If blockages are stubborn, soak the arms in a mixture of warm water and vinegar to dissolve mineral deposits.
- Reattach the spray arms: Ensure they are secure and spin freely. This guarantees that water will reach all your dishes.
By keeping the spray arms clear, you ensure that water circulates properly. Clean spray arms mean better dishwashing results. Remember to check and clean the spray arms regularly to maintain peak performance.
Cleaning the Dishwasher’s Accessories
After ensuring the main components of the KitchenAid dishwasher are spotless, tend to the accessories. These include the cutlery basket, dish racks, and any other removable parts. Here’s how to thoroughly clean these accessories:
- Remove All Accessories: Take out the racks, utensil holder, and any other removable parts.
- Soak in Soapy Water: Fill your sink with warm, soapy water. Soak the accessories for about 15-20 minutes. This loosens the grime.
- Scrub Thoroughly: Use a non-abrasive sponge or brush. Scrub each item to remove food particles and residue.
- Rinse with Clean Water: After scrubbing, rinse each accessory under running water.
- Dry Completely: Before putting them back, dry each part with a clean towel or let them air-dry.
Cleaning these accessories is key for maintaining hygiene. It also helps in ensuring that your dishes come out clean in every wash cycle.
Using the Vinegar Wash Technique
Using distilled white vinegar can greatly enhance the cleanliness and performance of your KitchenAid dishwasher. Vinegar is a natural cleaning agent that can break down grease, remove odors, and clear away limescale. Here’s how you can use the vinegar wash technique safely and effectively:
- Prepare the Dishwasher: Make sure the dishwasher is empty. Remove any dishes or utensils.
- Place a Cup of Vinegar: Fill a dishwasher-safe cup with white vinegar. Place this on the top rack of the dishwasher.
- Run a Hot Water Cycle: Set the dishwasher to run a normal cycle with hot water. The vinegar will disperse during the cycle.
- Wipe Down After the Cycle: Once the cycle is complete, open the dishwasher. Use a soft cloth to wipe the insides. Pay special attention to the door and gasket areas.
This vinegar wash technique helps to maintain the dishwasher’s efficiency. It ensures your appliance operates optimally, providing a natural way to disinfect and deodorize your dishwasher.
Monthly Maintenance Tips for Your Dishwasher
Maintaining your KitchenAid dishwasher monthly ensures its longevity and optimal performance. Here are some practical tips to keep it in top shape:
- Inspect and Clean the Filters Regularly: Check the dishwasher filters every month. Remove any trapped food particles or residue.
- Check for Spray Arm Clogs: Regularly inspect the spray arms for clogs. Clean them as needed to ensure water flows freely.
- Freshen Up with Vinegar: Run a vinegar wash cycle monthly. This helps dissolve mineral build-up and eliminates odors.
- Check and Clean the Seals: Wipe the door seals with a damp cloth. This prevents leaks and protects the seals from wear.
- Examine the Dish Racks: Look for rust or chips on the dish racks. Apply a rack repair kit if necessary to prevent further damage.
- Run Empty Hot Washes: Every month, run a hot wash cycle with the dishwasher empty. It helps flush out any leftover debris and keeps the interior clean.
By following these monthly maintenance tips for your KitchenAid dishwasher, you can help prolong its lifespan and ensure it runs efficiently.
Troubleshooting Common Dishwasher Cleaning Issues
Even with regular maintenance, you might run into problems with your KitchenAid dishwasher. Here are some common issues and how to fix them:
Dishwasher Not Draining Properly
First, check the filter and drain for blockages. Clear any food particles or debris. Make sure the drain hose isn’t kinked. Run an empty cycle to test if the issue resolves.
Dishes Not Coming Out Clean
Ensure that the spray arms are not clogged. Check that you’re using the right detergent and its correct amount. Load the dishwasher correctly so water can reach all items.
White Film on Dishes
This is often due to hard water. Use rinse aids that are made for hard water. Run a cycle with vinegar to remove any limescale buildup.
Dishwasher Smells Bad
Food trapped in the filter or crevices can cause odors. Clean the filter, and wipe the interior with vinegar. Run a hot water cycle with baking soda.
Dishwasher Makes Noise
Objects stuck in the spray arm can make noise. Inspect and remove any debris. Ensure that dishes are secure and don’t touch the spray arms.
By tackling these common cleaning issues, you can keep your KitchenAid dishwasher running smoothly. Regular checks can prevent many of these problems. If issues persist, consult the manual or seek professional help.

