Overview of KitchenAid Dishwasher Filter
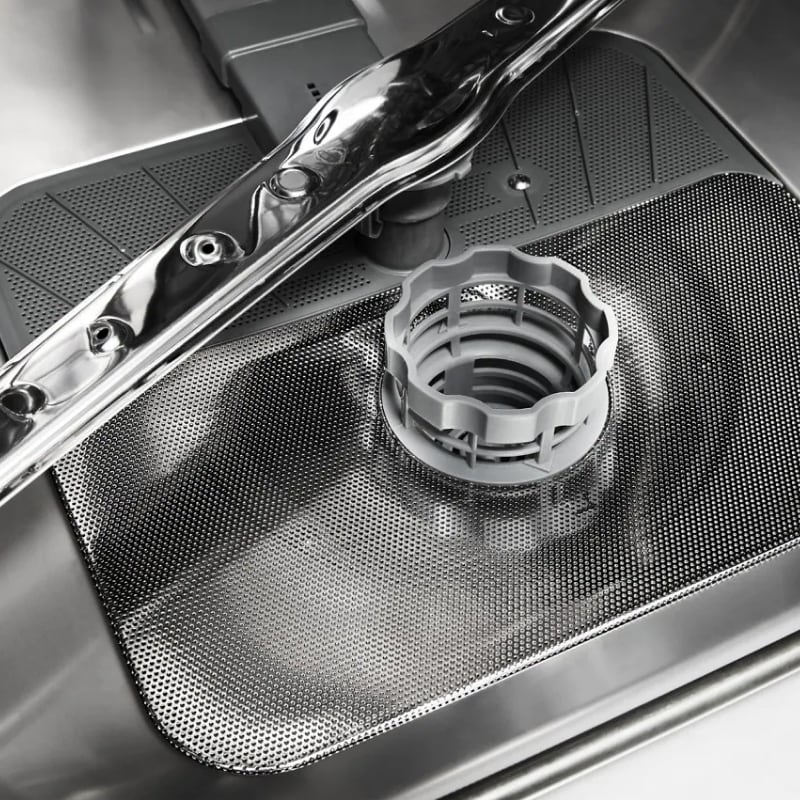
How to clean KitchenAid dishwasher filter? The KitchenAid dishwasher filter plays a crucial role in your machine’s performance. It traps and removes food particles and other debris during the wash cycle. This prevents food remnants from redepositing onto your dishes. Over time, the filter can collect a significant amount of debris, affecting the dishwasher’s efficiency. Regular cleaning of the filter is essential to maintain optimal performance. It’s usually located at the bottom of the dishwasher, but its exact placement can vary depending on the model.
Knowing how to clean the KitchenAid dishwasher filter can extend the life of your appliance and improve its cleaning effectiveness. That’s why it’s important to understand when and how the filter should be maintained. This guide will help you identify signs that your filter needs cleaning and provide step-by-step instructions to ensure thorough maintenance.
Signs Your Dishwasher Filter Needs Cleaning
Identifying when your KitchenAid dishwasher filter needs cleaning is key to maintaining its performance. Here are a few signs:
- Dishes aren’t getting clean: If your dishes remain dirty or have food particles after a wash, it could signal a clogged filter.
- Poor water drainage: A slow or poor drainage system often points to a blocked filter, impeding water flow.
- Unpleasant odors: Foul smells emanating from your dishwasher are a clear sign that food debris has built up in your filter.
- Visible debris: Notice visible particles or gunk in the bottom of the dishwasher? It’s time to check the filter.
Recognizing these signs will help you know when to perform maintenance on your KitchenAid dishwasher filter.
Safety Precautions Before Cleaning
Before diving into how to clean your KitchenAid dishwasher filter, ensure you take all safety precautions to prevent any accidents or damage. Here are some important steps to follow:
- Turn off the dishwasher: Always switch off your dishwasher from the power source before attempting any maintenance or cleaning.
- Let it cool: If your dishwasher just ran a cycle, wait until it has cooled down to avoid any risk of burns from hot surfaces.
- Use proper tools: Gather the recommended tools for your model, such as a soft-bristle brush or sponge. Avoid using harsh or abrasive tools that could damage the filter.
- Wear gloves: Protect your hands with gloves, especially when handling dirty or greasy components.
- Check the manual: Take a moment to consult your KitchenAid dishwasher’s manual for any specific instructions or warnings related to your particular model.
- Prepare your work area: Lay out a towel or cloth to place parts on as you remove them, keeping them safe and preventing water from getting everywhere.
By following these simple yet crucial precautions, you’ll ensure a safe and effective cleaning process for your KitchenAid dishwasher filter.
Step-by-Step Guide to Cleaning the Filter
Step 1: Locate the Filter
Start by locating your KitchenAid dishwasher filter. Typically, it’s at the bottom of the dishwasher. Remove the bottom rack for easier access.
Step 2: Remove the Filter
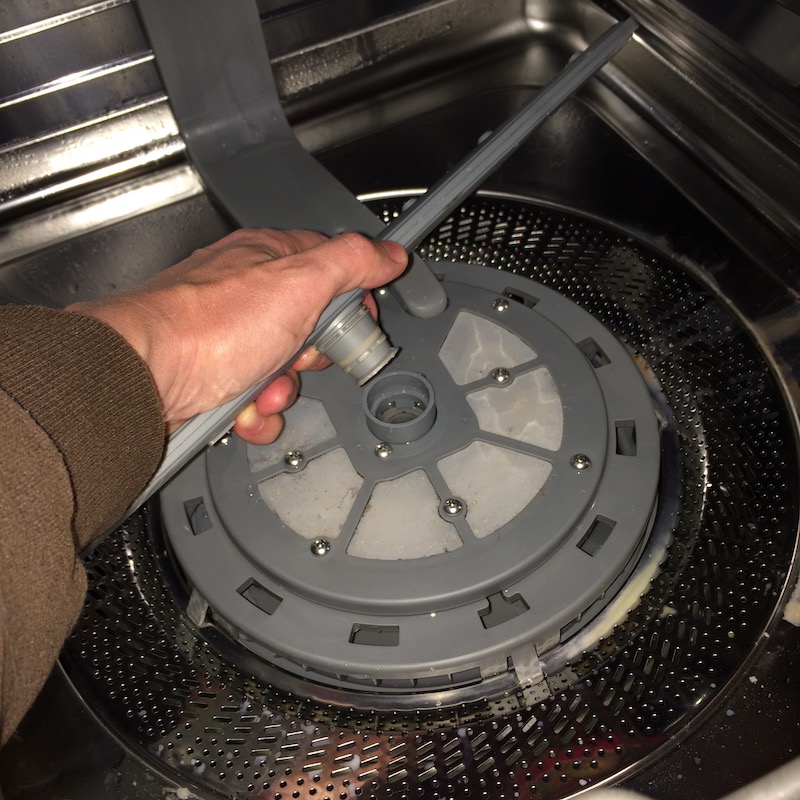
Turn the filter’s knob or handle gently to release it. Pull it upwards and out of the dishwasher.
Step 3: Rinse the Filter
Hold the filter under running water. Use a soft brush to remove loose debris. Be gentle to avoid damage.
Step 4: Remove Debris
For stubborn gunk, soak the filter in warm, soapy water. Let it sit for about 10 minutes. Scrub lightly again then rinse.
Step 5: Replace the Filter
After cleaning, ensure the filter is dry. Place it back into its slot and lock it by turning it securely. Reinsert the bottom rack.
Cleaning Solutions for Dishwasher Filters
When cleaning the KitchenAid dishwasher filter, choosing the right cleaning solution is crucial. This affects both the cleanliness of the filter and the longevity of your dishwasher. Here are effective and safe solutions you can use:
- Warm Water and Dish Soap: This is the most straightforward method. Mix warm water with a few drops of a mild dish soap. Soak the filter in the solution for about 10 minutes to loosen debris before scrubbing gently with a soft brush.
- Vinegar Solution: Vinegar is an excellent natural cleaner that can help dissolve grease and buildup. Combine equal parts of white vinegar and hot water. Submerge the filter for 15 minutes, then brush off any remaining particles.
- Baking Soda Paste: For tough grime, baking soda can be effective. Make a paste using baking soda and a little water. Apply it directly to the filter and let it sit for a few minutes before scrubbing gently. Rinse thoroughly afterward.
After using any of these solutions, always make sure to rinse the filter with clean water until all soap, vinegar, or baking soda is gone. This ensures no cleaning residue remains, which could affect your dishwasher’s performance. Remember to dry the filter completely before replacing it to prevent mold and mildew growth.
Utilizing the right cleaning solutions will help you maintain a clean and functional KitchenAid dishwasher filter, leading to better dishwasher performance and cleaner dishes.
Maintaining Your Dishwasher Filter
Proper maintenance of your KitchenAid dishwasher filter is crucial for optimal performance. Here are straightforward steps to keep your filter in top condition:
- Regular Checks: Inspect your filter monthly to ensure it is not clogged with debris.
- Prompt Cleaning: Clean the filter immediately if you notice it is dirty during your checks.
- Dry Thoroughly: After washing the filter, dry it completely before putting it back to prevent mold.
- Avoid Harsh Chemicals: Use mild detergents as recommended, avoiding harsh chemicals that might damage the filter.
- Follow Instructions: Consult your dishwasher’s manual for specific maintenance tips related to your model.
- Gentle Handling: Always handle the filter gently during cleaning to avoid any tears or damage.
By following these simple maintenance tips, you will ensure prolonged life and efficiency of your KitchenAid dishwasher filter.
Troubleshooting Common Issues
When maintaining your KitchenAid dishwasher filter, you may encounter a few common issues. Addressing these problems promptly can help keep your dishwasher running smoothly. Here’s how to troubleshoot some typical concerns:
- Filter Won’t Come Out: If the filter seems stuck, do not force it. Double-check if you have turned it the correct way. If it still won’t budge, consult your manual for guidance.
- Filter Is Damaged: Inspect the filter for any cracks or tears. A damaged filter needs replacing to ensure effective cleaning.
- Dishwasher Still Smells: If foul odors persist after cleaning the filter, food particles may be trapped elsewhere. Check and clean the spray arms and interior walls.
- Dishes Aren’t Clean After Filter Maintenance: If issues persist even after cleaning the filter, additional parts like the spray arms may need attention. Ensure they are clear of debris for a proper water flow.
- Water Doesn’t Drain Fully: A persistent drainage issue might not be the filter’s fault. Check the drain hose for kinks or clogs and consult a professional if needed.
Conclusion
A dishwasher filter is a component of a dishwasher that helps to trap food particles and other debris that can clog the dishwasher’s drainage system. It is usually located at the bottom of the dishwasher and needs to be regularly cleaned to ensure proper functioning of the appliance. Some dishwashers have removable filters that can be easily cleaned, while others may require more involved maintenance. Regular cleaning and maintenance of the dishwasher filter can help prevent clogs and maintain the efficiency of the dishwasher.
Remember, keeping the KitchenAid dishwasher filter clean is key to the health of your appliance. If you try these fixes and problems continue, seeking professional advice may be the best course of action.

